
Have you ever needed clay for a project, but didn’t have any? Me, too. I want to do a project with my kids and realize we don’t have clay. Ugh!
Now what do I do?!
I hate buying a lot of clay because it gets expensive. It especially gets expensive with my son’s elaborate projects. So, I decided to take a look on Pinterest and find homemade clay recipes. I found recipes. A LOT!
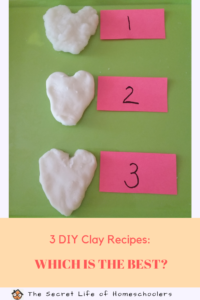
I decided I would try 3 clay recipes and compare them. My criteria were:
- inexpensive to make
- easy to make
- ingredients that I would have around the house
- smooth clay
- easy to use
- dries well so items can be painted
Here are the clay recipes and my results.
DIY Clay Recipe #1
The first clay recipe I decided to try I found out at this site. It had a few simple ingredients, so I decided to give it a try. Here is the recipe.
Ingredients
- 1/2 cup corn starch
- 1 cup of salt
- 1 cup boiling water
Instructions
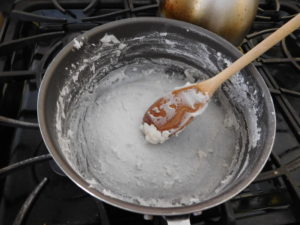
- Boil the mixture until the texture resembles a soft ball.
- Turn the dough onto wax paper and knead it.
- It is ready to use.
It is recommended to store leftover clay wrapped in a damp cloth in an airtight container. If you want to save your creations, they can let it air dry or bake it at 200 degrees.
Review of Clay #1
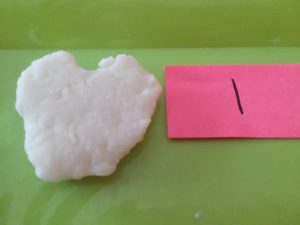
I did not care for this recipe. It made a huge mess of my pan when I was boiling it. It has a gritty texture because of all the salt. It did not have a smooth consistency like clay.
I air dried the clay. It felt odd. It reminded me of when my daughter did the milk and vinegar experiment. It was kind of a plastic feel to it.
Overall, I don’t think it makes a good clay. It may be something kids might like to play with, though.
DIY Clay Recipe #2
After the last recipe, I decided to try making clay that didn’t require cooking. I found another recipe at Fantastic Fun and Learning. The site provides step-by-step directions and a link to a video with helpful tips. Here is what you need.
Ingredients
- 4 oz bottle of school glue
- 4 oz corn starch
- 2 tbsp baby oil (or substitute with vegetable oil)
- 2 tbsp lemon juice (or substitute with white vinegar)
Instructions
- Pour the glue in a microwave-safe bowl, and add the corn starch.
- Add baby oil and lemon juice, and mix it all together.
- Place the bowl in the microwave on high for 30 seconds.
- Stir the mixture.
- Put it back in the microwave for another 15 to 30 seconds.
- When the clay is cooled, turn it out on wax paper sprinkled with corn starch.
- Knead the clay.
- Sprinkle corn starch throughout the clay while you knead it. Keep adding in corn starch until it is no longer sticky.
- Now it is ready to use.
Review of Clay #2
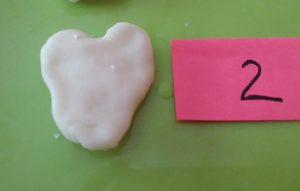
I liked this clay. It was soft and smooth. If you used baby oil, it will smell good, too! You may have to work cornstarch through the dough a little bit so it isn’t sticky. Eventually, it is a nice texture.
I air-dried this clay, too. It dried nicely and was a smooth texture. It doesn’t look like clay, but it is a nice alternative.
My kids loved this clay! It was their favorite.
DIY Clay Recipe #3
After the last recipe that involved cooking, I was hesitant to try a different one. I decided to give it a try because I liked the ingredients. It sounded promising.
I found this recipe over at Growing a Jeweled Rose.
Ingredients
- 2 cups of baking soda
- 1 cup of corn starch
- 1 and 1/2 cups of cold water
Instructions
- Mix all the ingredients together in a pot.
- Place the pot on the stove and heat over medium-high heat.
- Stir the mixture constantly.
- Keep stirring until the mixture comes together and looks like mashed potatoes.
- Remove the pot from the stove and dump the mixture in a bowl.
- Place a damp cloth over the top and let the clay cool.
- When cool, turn it out onto a surface sprinkled with corn starch and knead it.
- It is ready to use.
Review of Clay #3
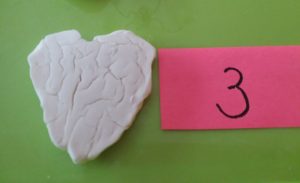
This clay recipe was smooth. It was easy to sculpt with, too.
I let this recipe air dry, and I ran into problems. It cracked!
I did research. I wanted to find out why it cracked, and how to prevent it. After reading several articles and watching YouTube videos, I discovered clay with
So what is the solution?
Apparently, if you place a plastic bag over the clay, it will dry slower but may not crack as easily. It is something to keep in mind when it is a cold, dry winter’s day.
Other than the cracking, it was a nice alternative to real clay. It would work well for kid’s projects.
How the Clay Met My Criteria
- Inexpensive to make: Met my expectations. Glue, baking soda, corn starch, and salt are not expensive. I buy most of these items in bulk so it is even cheaper.
- Easy to make: Clay recipe #2 and #3 were easy to make. Clay recipe #1 wasn’t hard, but it was difficult judging when to remove it from the stove.
- Ingredients that I would have around the house: All met the criteria for me.
- Smooth Clay: Clay #2 and #3 were smooth.
- Easy to use: All of them were easy to use.
- Dries well so items can be painted: This is mixed. Clay #2 met this. Clay #1 can be painted but is very bumpy and not a smooth finish. You can paint Clay #3 even with the cracks.
Final Thoughts
If you want to use one of the recipes that most resembles clay, Clay Recipe 3 is the one. It is more like clay than the other two.
I would definitely use Clay recipes 2 and 3 again. Both were easy to make and felt smooth. I will make sure to allow more time and to cover Clay #3 when it is drying. I think the weather conditions played a big part in the cracking.
On a side note, a friend of mine reminded me little ones have a tough time using real clay. Real clay needs to be worked to soften it up. This is tough for little hands. Homemade clay is a good alternative for toddlers and preschoolers that don’t have the hand strength
Homemade clay is a fun activity to make with kids. It is also nice to have some good recipes on hand for times you don’t have any in the house. I learned a lot in experimenting with different clay recipes. I hope this is helpful for when you’re looking for your own DIY clay recipes.
Do you have a different clay recipe you use? Share in the comments below.

Very informative. You. These look like fun projects.
[…] your own clay, slime, or play dough (Click here for clay […]